This website is managed by Ultima Markets’ international entities, and it’s important to emphasise that they are not subject to regulation by the FCA in the UK. Therefore, you must understand that you will not have the FCA’s protection when investing through this website – for example:
You will not be guaranteed Negative Balance Protection
You will not be protected by FCA’s leverage restrictions
You will not have the right to settle disputes via the Financial Ombudsman Service (FOS)
You will not be protected by Financial Services Compensation Scheme (FSCS)
Any monies deposited will not be afforded the protection required under the FCA Client Assets Sourcebook. The level of protection for your funds will be determined by the regulations of the relevant local regulator.
Note: UK clients are kindly invited to visit https://www.ultima-markets.co.uk/. Ultima Markets UK expects to begin onboarding UK clients in accordance with FCA regulatory requirements in 2026.
If you would like to proceed and visit this website, you acknowledge and confirm the following:
1.The website is owned by Ultima Markets’ international entities and not by Ultima Markets UK Ltd, which is regulated by the FCA.
2.Ultima Markets Limited, or any of the Ultima Markets international entities, are neither based in the UK nor licensed by the FCA.
3.You are accessing the website at your own initiative and have not been solicited by Ultima Markets Limited in any way.
4.Investing through this website does not grant you the protections provided by the FCA.
5.Should you choose to invest through this website or with any of the international Ultima Markets entities, you will be subject to the rules and regulations of the relevant international regulatory authorities, not the FCA.
Ultima Markets wants to make it clear that we are duly licensed and authorised to offer the services and financial derivative products listed on our website. Individuals accessing this website and registering a trading account do so entirely of their own volition and without prior solicitation.
By confirming your decision to proceed with entering the website, you hereby affirm that this decision was solely initiated by you, and no solicitation has been made by any Ultima Markets entity.
Discover what a breaker block is, how it forms, and learn how to trade it. Read about the differences and refine your strategy with Smart Money concepts.
A breaker block is a price action concept rooted in Smart Money trading strategies such as ICT. It forms when a previously valid order block fails and later flips into the opposite role. In practice, this means an area that once acted as demand (support) may transform into supply (resistance), or vice versa.
This shift is not random. It reflects where institutional players have changed their intent. By understanding breaker blocks, traders can better identify points of reversal, continuation, or confirmation in market structure.
How a Breaker Block Forms
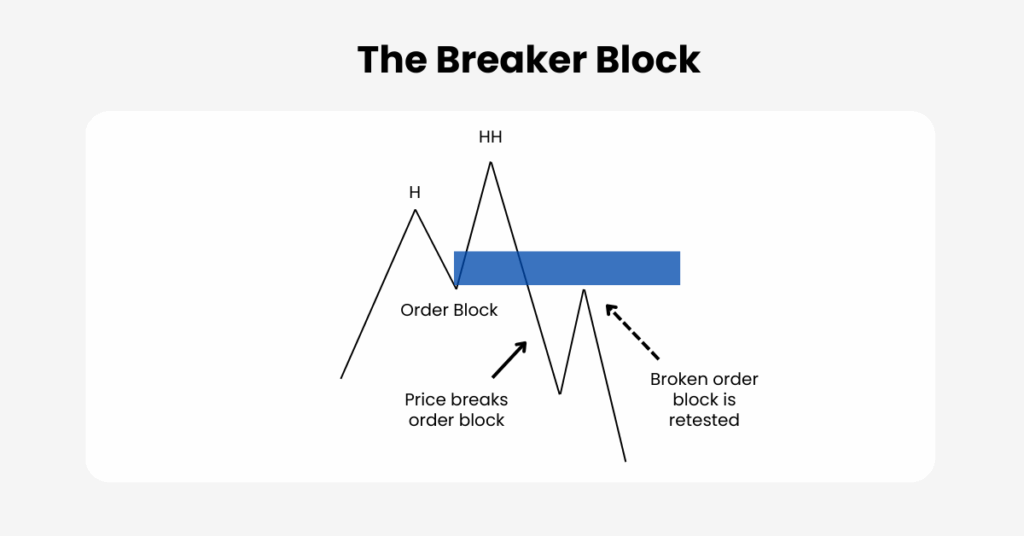
A breaker block forms through a very specific sequence of price action. It typically starts with the development of an order block, a consolidation zone where institutional traders likely placed large orders before a sharp move. Traders often anticipate these areas will hold when retested.
However, when price returns to this order block and pushes through it with strength, the block becomes invalidated. This invalidation is crucial: it signals that the original buying or selling pressure is no longer dominant, and control has shifted to the opposite side. The failed order block now becomes a breaker block.
The story doesn’t end with invalidation. What makes a breaker block useful is how price behaves afterwards. Once the zone has flipped, price frequently retests it from the other side.
For example, a bearish breaker block occurs when a bullish order block breaks down; on retest, the same level may act as resistance, providing a potential entry for short trades. Similarly, a bullish breaker block arises when a bearish order block fails, flipping into new support.
This process of formation, invalidation, and retest creates the framework for trading with breaker blocks. Each stage tells a story about who is in control of the market.
Bullish and Bearish Breaker Blocks in Action
The simplest way to visualise breaker blocks is through swing structure.
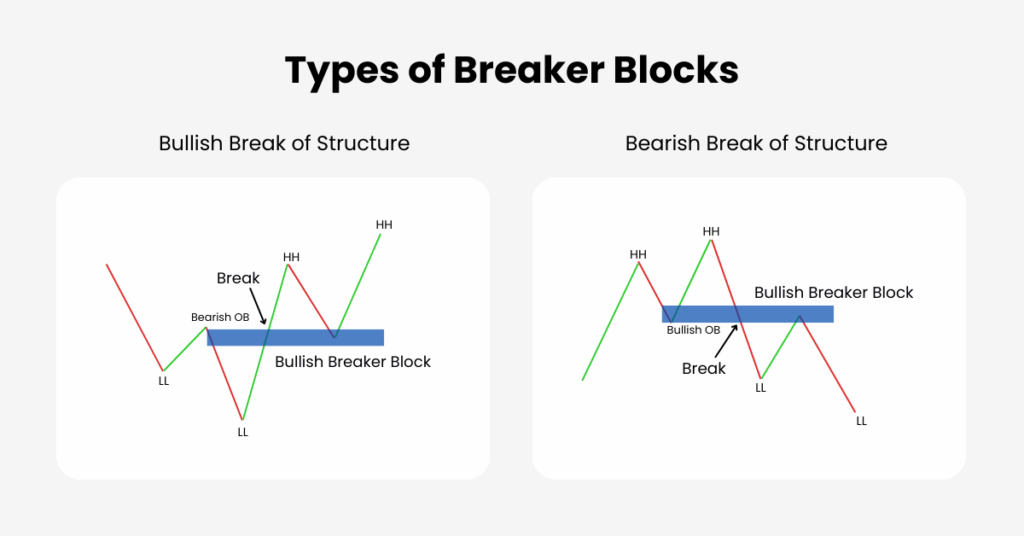
A bullish breaker block follows the sequence: low → high → lower low → higher high. The series of up-close candles between the low and the high becomes the breaker block. Once retested, it often acts as support.
A bearish breaker block unfolds as high → low → higher high → lower low. The down-close candles between the high and the low form the breaker block. On retest, this zone becomes resistance.
This four-step structure keeps identification consistent and avoids confusing breaker blocks with ordinary support and resistance zones.
Breaker Block vs Order Block vs Mitigation Block
Because breaker blocks build directly from order blocks, it’s important to distinguish between the three. An order block represents the original area where institutional orders were likely placed before an impulsive move.
A breaker block is an order block that has failed and flipped, marking a structural change. A mitigation block, by contrast, is a valid order block that holds when retested, allowing institutions to fill remaining orders.
In simple terms: order blocks show intent, breaker blocks show a shift, and mitigation blocks show continuation. While these concepts overlap, recognising the difference helps traders understand whether the market is maintaining its previous direction or turning into something new.
Trading with Breaker Blocks
The most effective way to trade breaker blocks is to wait for the retest after invalidation. Rather than chasing the breakout itself, traders give price the space to return and confirm the new role of the zone. For instance, after a bearish breaker block forms, waiting for price to climb back into that level and reject it offers a controlled short entry.
Risk management is a key part of this setup. Stop-losses are generally placed just beyond the breaker block, ensuring that if the market invalidates the level again, the trade exits with limited damage. Profit targets are typically set at nearby liquidity pools such as prior highs or lows, giving logical exit points that align with institutional behaviour.
Some traders strengthen this strategy by combining breaker blocks with other Smart Money tools. For example, when a breaker block overlaps with a Fair Value Gap (FVG), it forms what some call a “unicorn model,” a powerful confluence of displacement and structural shift. These overlaps provide even stronger evidence of institutional activity.
How to Identify Strong Breaker Blocks
Not every block is equal. The most reliable ones tend to form after decisive invalidations, often marked by impulsive candles that sweep liquidity and close beyond the original zone. Strong breaker blocks also line up with a clear break of structure or change of character, reinforcing that the market is truly shifting.
Context is equally important. A breaker block aligned with higher timeframe direction carries more weight than one forming against it. Confluence with other signals such as liquidity grabs, volume spikes, or Fair Value Gaps adds further reliability.
Conclusion
Breaker blocks capture one of the most important dynamics in trading: the moment when institutional control changes hands. They highlight where old demand turns into supply, or old supply becomes demand, offering traders a roadmap to enter trades with clearer structure.
By understanding how they form, distinguishing them from order blocks and mitigation blocks, and applying them with disciplined risk management, traders can use these blocks to trade more in tune with institutional flow. Combined with higher timeframe analysis and confluence tools, breaker blocks become not just a pattern, but a lens for seeing the market’s true intent.
Disclaimer: This content is provided for informational purposes only and does not constitute, and should not be construed as, financial, investment, or other professional advice. No statement or opinion contained here in should be considered a recommendation by Ultima Markets or the author regarding any specific investment product, strategy, or transaction. Readers are advised not to rely solely on this material when making investment decisions and should seek independent advice where appropriate.
Thank you for visiting the Ultima Markets website. Please note that this website is intended for individuals residing in jurisdictions where access is permitted by law. Ultima and its affiliated entities do not operate in your home jurisdiction.
By clicking ‘Acknowledge’, you confirm that you are entering this website solely on your own initiative and not as a result of any specific marketing outreach. You wish to obtain information from this website based on reverse solicitation principles, in accordance with the applicable laws of your home jurisdiction.